When we arrived home, we were welcomed back to our house by signs my family made. So thoughtful! :)

Jim and Nancy was a family joke...

Many days were spent trying to get over the jet lag.
This picture of C literally holding his eye open cracks me up, because that's really what it's like...you want to stay awake to do things or to get your body back in line with this part of the world, but your body is so tired that it just won't let you sometimes.

The day after we got home, Talton and I picked out new carpet and laminate for our house. We didn't want to waste any time after arriving back, because we wanted to get it all put in while our house was still empty before all of our stuff was delivered a couple weeks later.
So since we knew we'd be ripping out all the flooring in our house very soon, that was the perfect time for me and my mom to go in and repaint a couple rooms. (It wasn't until after we started painting that we realized it was pointless to put those drop cloths down, because we didn't care if it got on the carpet.) We went to Home Depot at like 8:00 at night to get paint and painted until 4:30 the next morning. It was long, but it was necessary to get it all done at once because we didn't have any other free days coming up to devote to painting.
We painted Parker's old room grey...or so I thought. It ended up looking more like lavender, so I actually repainted it myself a month later. I'm still not happy with it, but I'll paint that room for the third time later. The boys are now sharing a room so we can have our study back...woo hoo!


This was Connar's old room. It went from pirates to a big boy room for the brothers in just a few hours. I was sad to paint over it, but I was also excited to see the change. :)


Thank God for my mom. She's the best painter I know and taught me everything I know about painting (which doesn't make me a pro by any means but at least I have an idea of how to do it). :)

After we painted, the new carpet was put in shortly after and then the boys' new beds were delivered (I actually ordered their bedding online when I was still in Korea because I knew the color scheme I wanted for their room...navy blue, lime green, and white with pops of orange). I bought their beds from Pottery Barn Kids, and I bought their bedding from a place online called Serena & Lily because it was the only place that had this bedding I had in mind, but I've since seen it several places (PBKids for example). I'll give you a little tour of their room, because I love it so much! :)
I knew with their small room that I'd have to be smart with the little bit of space that was available for two beds, all their clothes, and all of their toys and books. I actually pondered bunk beds for a while for the space issue, but I ultimately decided against it because (1) one of them would be mad they didn't get to sleep on the top, for sure (2) both of them would go flying off of it sooner than later, definitely (3) if one was sick I didn't want to have to climb to the top bunk to lay with them and (4) I could only imagine how tricky it would be to make a top bunk. We might consider bunk beds in the future when they're older, but for now, these twin beds are actually really perfect for us. I bought the beds with the two pull out drawers underneath to hold their clothes, since there would be no space for a big dresser in the room. I'm very happy with this decision.

It's hard to see, but their sheets and pillowcases have lime green stars all over, and there is lime green piping on the edge of their duvet covers.
I made the 8 picture canvases hanging around their room. It was crazy expensive to buy them, so I gave it a shot myself and it worked out great! I bought cheap canvases from Hobby Lobby, printed big pictures at Walgreens (searched for a coupon online and got a huge chunk of money off what I would've paid otherwise), and then I used Mod Podge to adhere them to the canvas and then used it on top of the pictures as well. I used velcro Command Strips I bought at Target to hang them on the wall. Perfect and so easy. :)


This little corner of their room makes me so happy! I bought the white shelf from Target (very easy to assemble) and had to order the navy boxes online from Target because they don't carry that color in the store anymore. The floating white shelves are from IKEA. I had the white lamp base from P's baby room, and I bought the orange shade from Target (boy I've said "Target" a lot in the past four sentences!). The orange bean bag with blue piping is from...you guessed it, Target! :) The bean bag in the corner is the perfect little reading nook!

I bought these clear shelves from here online: http://cleardisplays.com/card-display/greeting-card-holder/card-shelves-with-holes-for-hanging/ . They have different lengths, and they were really easy to hang (they did not come with any hardware to do so but that was fine). These are actually sold as greeting card shelves, but they worked exactly the way I wanted to display some of the boys' books. I put the rest of their books on the white shelf next to the bean bag.

So my mom was cutting blocks of wood for a project at her house, and I took three to make the following items for the boys' room (you can see the following two projects on the IKEA shelves two pictures above here).
* BOOK ENDS *
First I took a car and a monster truck from my boys' stash of 357 vehicles. I super glued them to the top of the bare wooden blocks. Then I used the same blue paint I used on the wall in their room to paint the wooden block (it took a few coats and a little paintbrush to get in all the nooks and crannies on these vehicles). After the blue paint dried, I used painter's tape to block off the area I wanted to paint orange, and I used a little bottle of craft paint from Hobby Lobby to do that (it took 4 or 5 coats of orange to get it like this). I just love when projects work out the way they are in my head! :)

* PICTURE BLOCK *
The block is painted, and then I trimmed down 5 pictures (no need for a bottom picture because it won't be seen) to fit on the sides and top. I used Mod Podge to adhere and cover the pictures on the block.

I had this genius idea to use Command Strips on the side of the white shelf to hang C's super hero capes. I'm so glad I thought of that, since, like I said, I'm low on space in this room and don't have a free space to cram something else.

The boys' closet has to be organized too, or this room would be an out of control wreck every day. I used a wooden shelf (like the big white one in their room, but smaller) on each boys' side of the closet as storage. I also put the canvas boxes at the top and hung a shelving unit in the middle. This closet is full of stuff, but at least it's organized. :)

I also made this sign that hangs above their closet door. I made it out of an old wooden drawer front my mom had. I painted it white, put vinyl letters on, painted over it white again to seal in the sides of the letters, painted it blue (the same paint on the opposite wall...no need to waste money buying more paint when using that paint will match perfectly), and then took the vinyl letters off to show the white paint underneath.

Another HUGE part of getting our house back in order was updating our floors.
We tore out all the carpet in the living room, bedrooms, and hallway, and put in new carpet in only the bedrooms and put laminate in the living room and hallway.
Seriously, picking carpet is one of the hardest things ever! That's so difficult to visualize what a huge area will look like based on a tiny little square of carpet, and I'm very much a visual person. I'm so happy with the carpet we chose, but I have to say that I definitely second guessed my decision. I actually went back to the store after Talton returned to Korea for a couple weeks to change the carpet we had chosen together, so I was having a meltdown in the carpet section at Home Depot trying to decide on something different all by myself. I finally decided on the one we have today, but I prayed and prayed that it would turn out to be a good decision, because I would've never lived down changing the carpet otherwise. :)

This is the carpet before. Clearly we built our house when we didn't have kids...we put in cream colored carpet. Big mistake. Huge. I always insisted that it would be fine because I wouldn't give my kids kool-aid or anything to drink on the carpet that would stain it. Well what I didn't account for was the body fluids (ex: vomit) that come out of those little people and there's nothing you can do about that.


The laminate man came and ripped the carpet out of the living room and hallway and got to work.

It wasn't long before he realized my floors weren't even. So that added another day on to the process, because it had to dry before he could lay the actual flooring.

The next day, he came back and finished the job. We love our new floors!

Well the same day the laminate man finished the living room and hallway, the carpet men showed up with my new carpet. :)


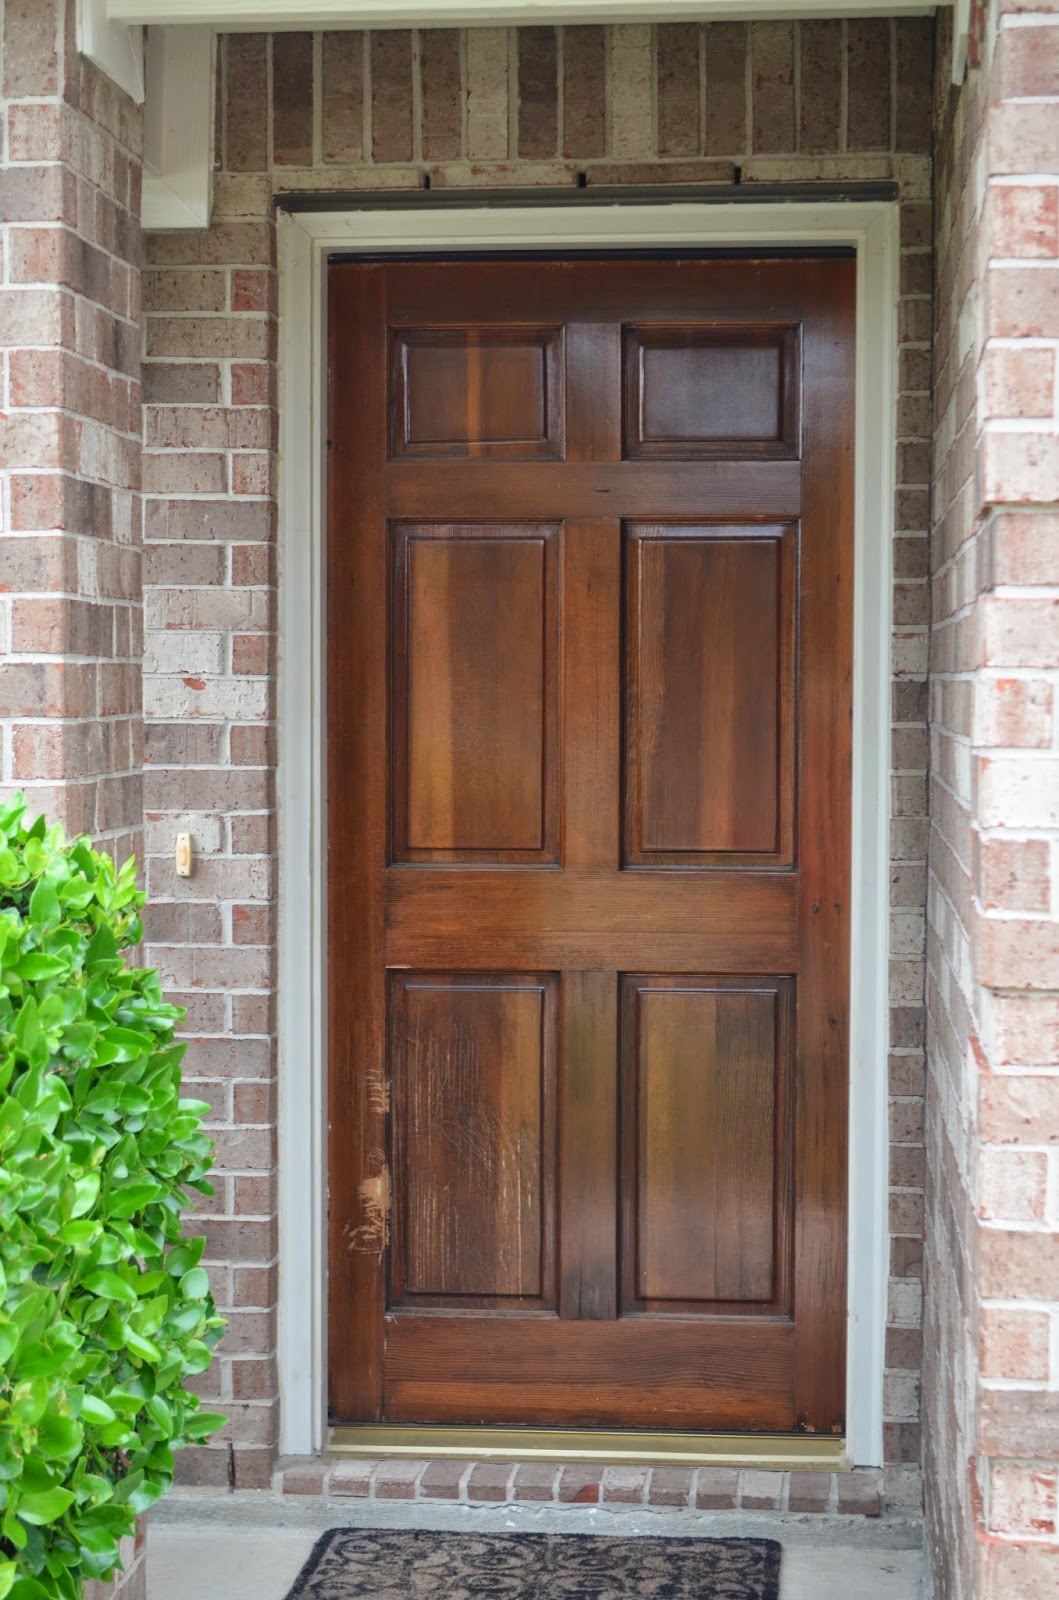
And as if two groups of men (laminate and flooring guys) wasn't enough in my house at once, the guy who was refinishing my front door came to haul it away.

(You can kind of see how weathered my door was. It was literally flaking off everywhere...the ground or your knuckles if you knocked on the door.)


The next big thing that needed to happen to get our house back in order was for all of our stuff to be delivered. Not only were we waiting on the air and sea shipments from Korea, we were also waiting on the stuff we put in storage in Houston to be delivered (this is the stuff like our furniture that we did not take to Korea and had been sitting in a facility for a year and a half). When the first truck pulled up, I was giddy! I couldn't wait to get my hands on my own couch, bed, kitchen items, etc.!


While the men unloaded, I set up a lawn chair in the kitchen and ate Mexican food for lunch. :)

The boxes were never ending, especially since the movers were at my house on four different occasions before it was all said and done.

Just when I'd get a big chunk of them unloaded, a new delivery would be unloaded and we'd be staring at a wall of boxes again.

The amount of recycling we had at the end was ridiculous...

So, that's how our house came back together. We still have a lot of stuff to do, and it's six months later, but I have to say that I don't even care about that because as long as I'm back in my own space/my own house/the place where I brought my children home from the hospital, I'm good. It was good to not only be home, but to be IN my home.
Next up was just getting back to living our lives in the U.S.. :)